Juicy Thai chicken thighs packed with bold flavors from garlic, ginger, and chili. Perfect for a quick weeknight dinner or meal prep favorite!
Thai chicken thighs are a burst of bold flavors wrapped in simplicity, making them a perfect choice for weeknight dinners or even special occasions.
This recipe brings together the creamy richness of peanut sauce with vibrant Thai-inspired seasonings, all cooked quickly and efficiently in an Instant Pot.
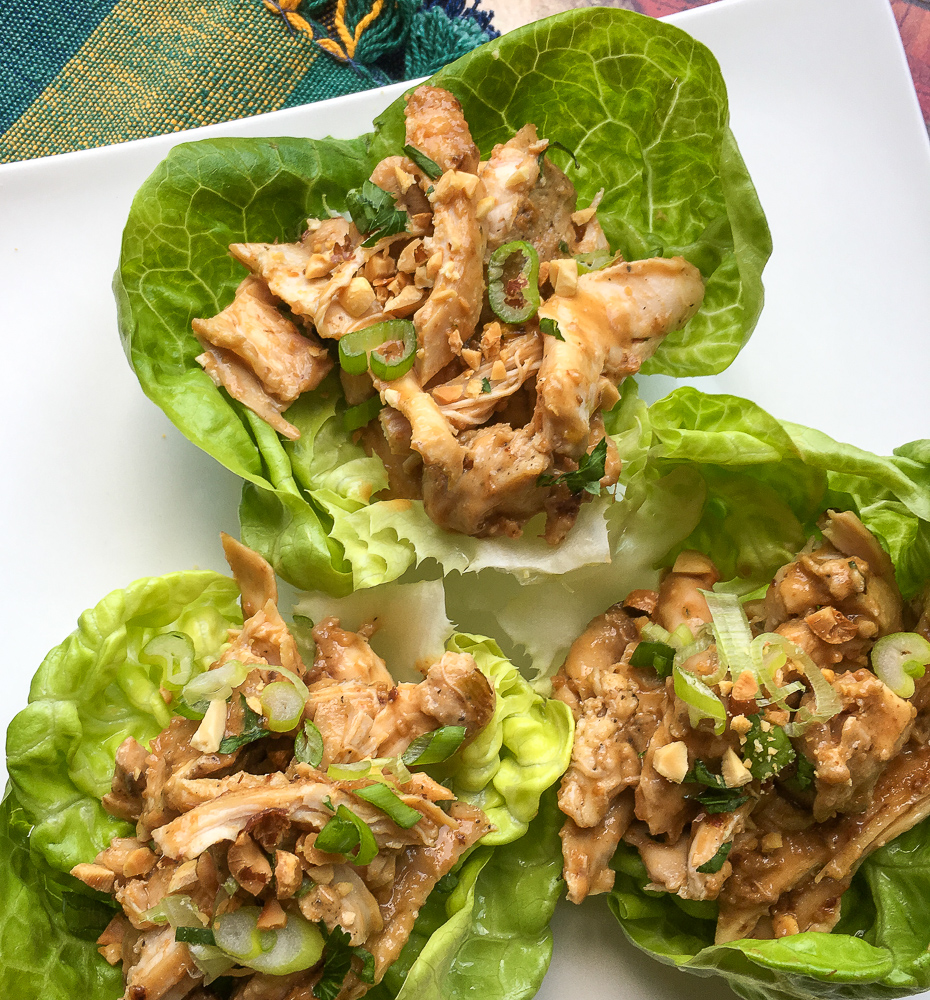
Whether you’re new to Thai cuisine or a seasoned fan, this dish is sure to impress while saving you time in the kitchen. Plus, the leftovers can easily transform into a completely new meal, like wraps full of protein and veggies.
For more creative meal ideas, you might want to check out our take on Chicken Satay with a Peanut Sauce. Get ready to add this versatile, crowd-pleasing recipe to your rotation!
We are sharing tips to help you get the best results when making this recipe. If you don’t need the tips, scroll to the bottom for the full recipe and printable recipe card.
⭐ Why You’ll Love this Recipe ⭐
Unparalleled Flavor Profile
What sets Thai chicken thighs apart is the harmonious blend of bold flavors that activate every taste bud. You’ll taste the nuttiness of peanut butter paired with the tangy brightness of lime juice and the spice of sriracha.
Easy to Customize
One of the biggest perks of this recipe is how adaptable it is. Not into spicy food? Simply reduce the amount of sriracha in the sauce. Want a stronger sweetness? Add an extra drizzle of honey.
Looking for a marinade-style chicken recipe with versatility? You might enjoy our Marinated Baked Chicken Thighs with Fingerling Potatoes for another great chicken idea.
Quick and Convenient
Thai chicken thighs might taste like a meal you spent hours preparing, but they’re actually super quick to make. Thanks to tools like the Instant Pot, you can have a gourmet-style dinner ready in about 20 minutes total. This makes it a smart pick for busy weeknights when time is limited but quality matters. Serve it alongside your favorite sides for a complete meal that’s Instagram-worthy (and delicious).
Leftovers That Transform
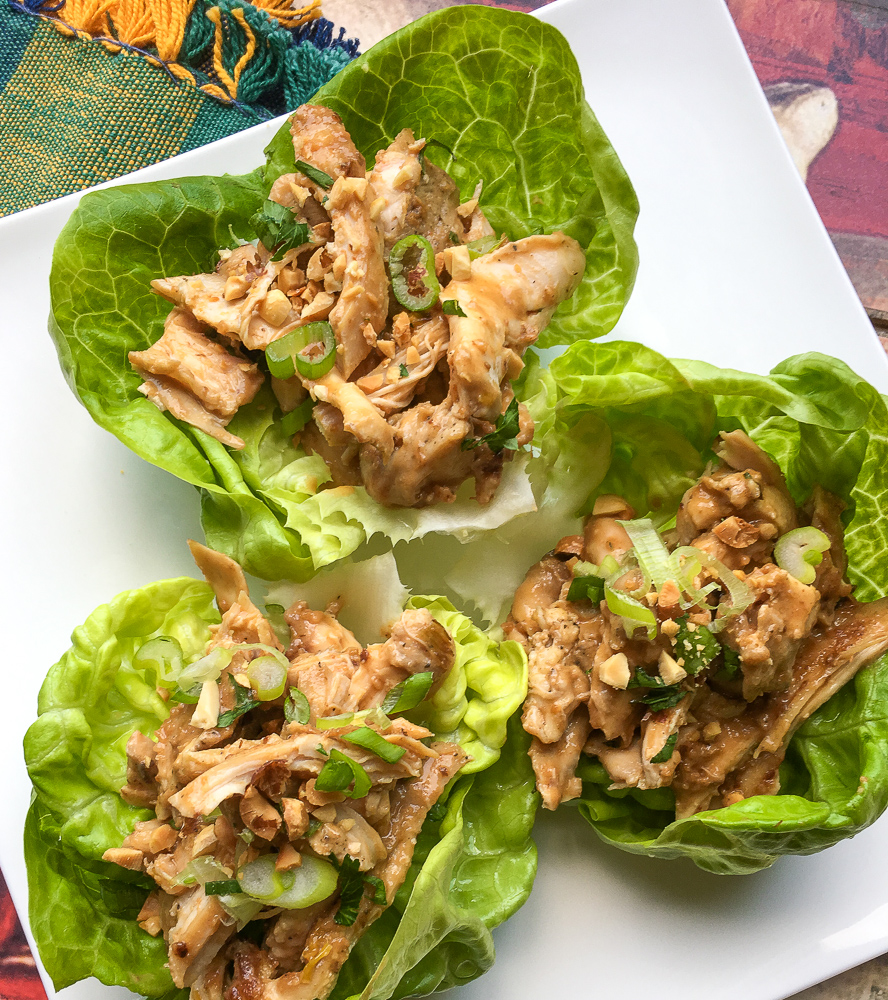
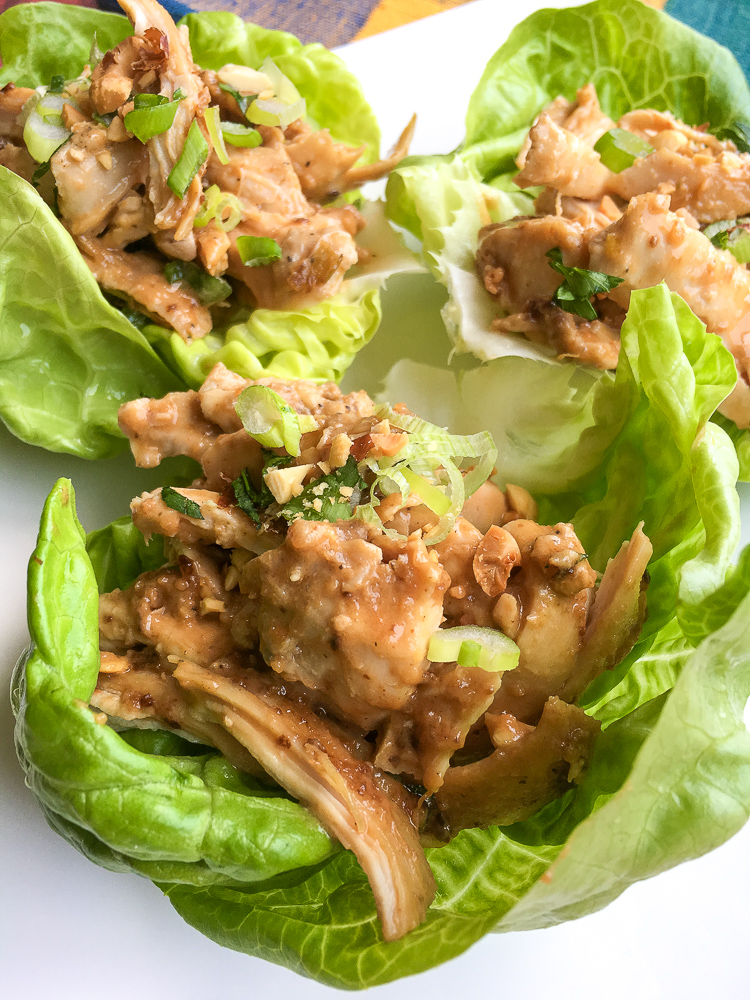
Trust us—leftovers of Thai chicken thighs are a blessing. Shred the meat, toss it into a lettuce wrap, or pair it with fresh veggies for a healthy and satisfying lunch the next day. The flavors even seem to deepen overnight, making them just as irresistible the second time around.
Perfect for Any Occasion
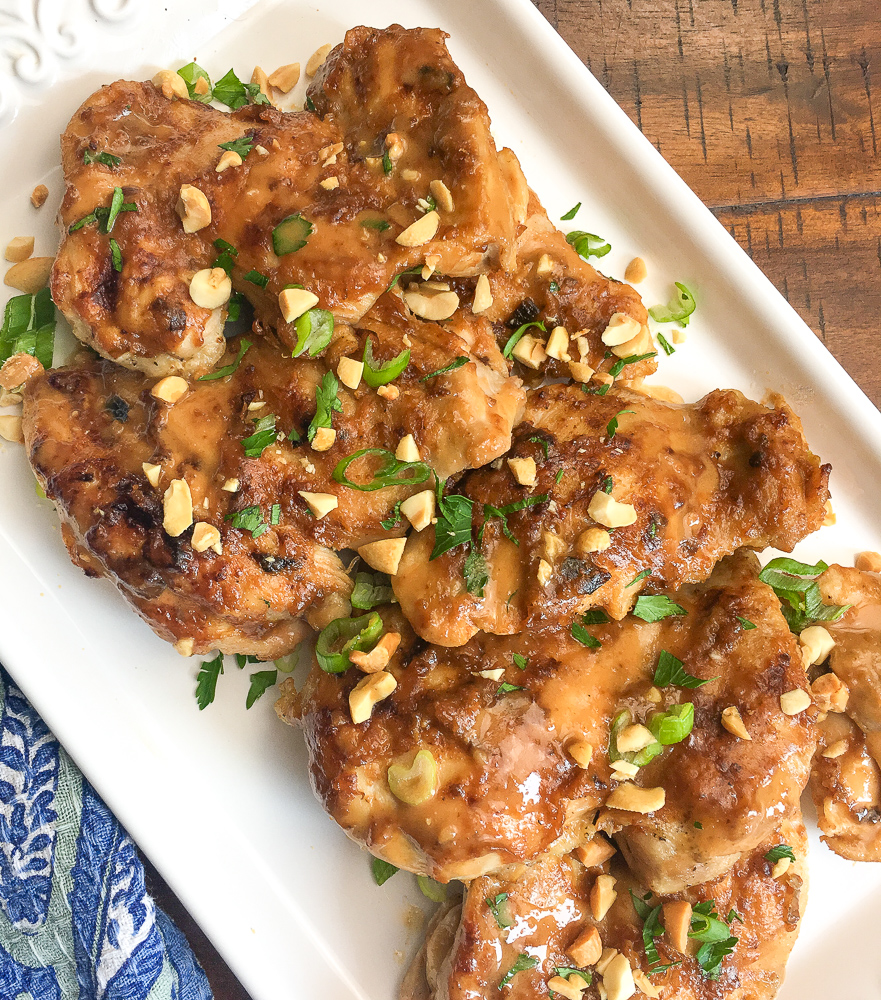
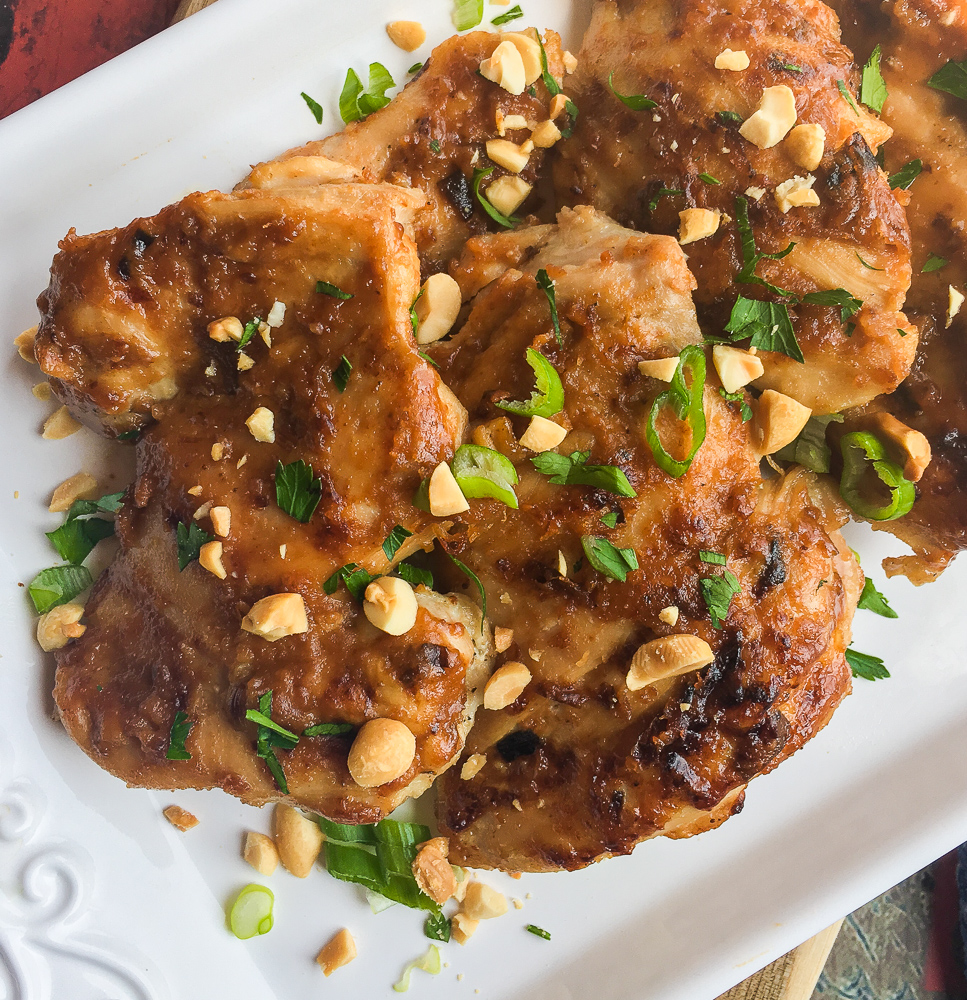
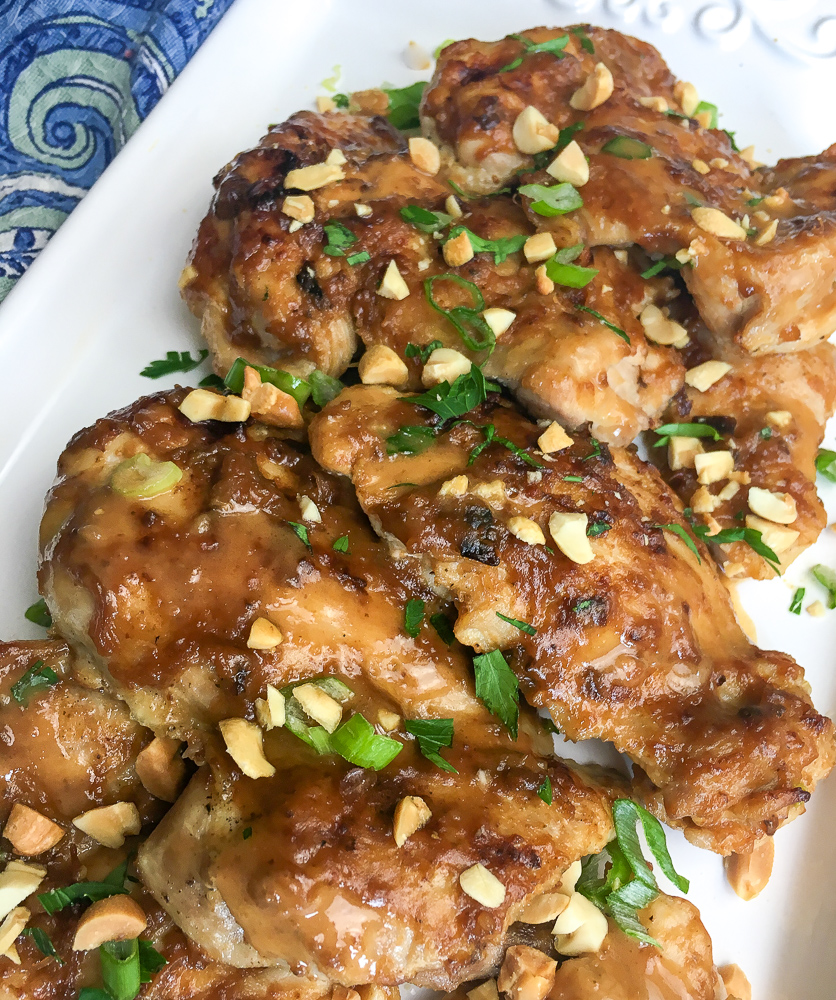
Thai chicken thighs are one of those rare dishes that feel equally at home at a casual weekday dinner and a special gathering. Whether you’re feeding picky kids or impressing party guests, this dish fits the bill with ease. Dress it up with garnishes like fresh cilantro and chopped peanuts, and you’ve got a centerpiece that’s as stunning as it is tasty.
🧾 Ingredients
📌 Be sure to see the recipe card below for the full ingredients list with quantities and step-by-step instructions!
- Sesame oil
- Boneless, skinless chicken thighs
- Chicken broth
- Sugar-free peanut butter
- Soy sauce or coconut aminos
- Fresh lime juice
- Honey
- Sriracha sauce
- Fresh ginger
- Garlic powder
- Salt and black pepper
- Fresh cilantro
- Roasted peanuts
- Green onions
🔪 How to Make Thai Chicken Thighs
Add sesame oil to the Instant Pot and select the “Sauté” function on high. Brown the chicken thighs in batches, if needed, cooking each side for about 3-4 minutes. Once browned, transfer the chicken to a plate and set aside.
Pour the chicken broth into the hot pot and use a spatula to scrape up any browned bits from the bottom. Stir in the peanut butter until fully melted. Add soy sauce, lime juice, honey, Sriracha, ginger, and garlic powder. Season with salt and pepper to taste, stirring until combined.
Place a metal rack inside the Instant Pot and arrange the browned chicken thighs on top.
Secure the lid and set the vent to “Sealing.” Choose the “Manual” function, set it to high pressure, and adjust the cook time to 10 minutes. The Instant Pot will begin building pressure after a short delay.
When the timer goes off, perform a quick release to let out the pressure. Carefully unlock and remove the lid. Transfer the cooked chicken to a platter.
If you’d like a thicker sauce, switch back to the “Sauté” setting. Stir continuously while letting the liquid reduce until it reaches your preferred thickness.
Turn off the Instant Pot and return the chicken thighs, along with any juices from the platter, back into the sauce. Toss the chicken to coat evenly.
Move the chicken to a serving dish and garnish with chopped cilantro, peanuts, and green onions, if you like. Serve immediately with extra peanut sauce and your favorite sides. Enjoy!
⭐ Tips and Tricks for Perfect Thai Chicken Thighs ⭐
Cooking chicken thighs can seem straightforward, but a few missteps can leave you with dry, underwhelming results. Here’s what to watch out for and how to steer clear of these pitfalls:
Underseasoning the Chicken: Don’t be shy with the sauce or spices. Thai chicken thighs rely on a blend of tangy lime, sweet honey, spicy sriracha, and earthy peanut butter for that ultimate flavor punch. Taste as you go, adjusting the sweetness, heat, or tang to suit your palate. Light seasoning won’t do this dish justice!
Overcooking the Chicken: Chicken thighs are forgiving compared to chicken breasts but can still turn tough if overdone. Using an Instant Pot is great because it allows you to control cooking time precisely. As a rule of thumb, aim for about 10 minutes using the “manual” high-pressure setting for tender and juicy results.
Skipping the Browning Step: You might be tempted to skip browning the chicken in the Instant Pot to save time, but trust us—it adds an extra layer of flavor that’s worth it. Getting those crispy, caramelized edges makes a big difference.
Peanut Sauce Too Thick or Too Thin: Since the Instant Pot needs adequate liquid to build pressure, ensure your peanut sauce is suitably thinned with chicken broth before cooking. If it’s too thick, it could burn; too watery, and you’ll lose that luscious coating. Adjust the sauce consistency before locking the lid.
Storage and Reheating Tips
Got leftovers? Great news—Thai chicken thighs reheat beautifully, and their flavor even intensifies with a little overnight rest. Follow these tips to store and reheat your chicken without losing that tender, juicy texture:
Storage: Allow the chicken to cool completely before transferring it to an airtight container. Store it in the refrigerator for up to 3-4 days. For longer storage, freeze the chicken in individual portions with a bit of extra sauce in each container—this helps preserve flavor and moisture.
Reheating: For the best results, warm the chicken over low heat on the stovetop, spooning the sauce over frequently to keep it moist. If you’re in a pinch, the microwave works too; just cover the dish with a damp paper towel to retain the steam. Avoid high heat, which can dry out the chicken.
📖 Variations
Kid-Friendly Variations
Worried about the little ones finding the dish too spicy or the textures too “grown-up”? Thai chicken thighs can easily be made kid-approved with a few tweaks that adapt both the spice level and overall presentation to better suit younger palates.
- Dial Down the Spice: Reduce or skip the sriracha in the sauce. Add just a pinch of spice, while increasing the honey or lime juice for a slightly sweeter, tangy version kids will find irresistible.
- Texture Adjustments: Children often prefer smoother, easier-to-chew foods. Consider shredding the chicken into bite-sized pieces after cooking. Serve it over rice or stuffed into soft wraps for something familiar and easy to eat.
- Tailored Serving Suggestions: Present the dish with fun sides like veggie sticks, or create a build-your-own setup where kids can add toppings like peanuts or cilantro themselves. This makes dinner both interactive and exciting.
More Delicious Recipes To Try
- Easy Chicken Pad Thai Recipe
- Drunkard Noodles- Thai Drunken Noodles with Rice Noodles- Easy $10 Dinner
- Easy General Tso Chicken Recipe


How to Make the Best Instant Pot Thai Chicken Thighs for Dinner
Ingredients
- 2 Tbsp sesame oil
- 2 lbs. boneless skinless chicken thighs
- 2/3 cup chicken broth
- ¼ cup sugar-free peanut butter
- ¼ cup gluten-free soy sauce or coconut aminos
- 2 Tbsp fresh lime juice
- 2 Tbsp honey preferably local
- 1½ Tbsp Sriracha sauce
- 2 tsp fresh ginger
- 1 tsp garlic powder
- Sea salt and black pepper to taste
Garnish:
- Fresh cilantro chopped
- ½ cup roasted peanuts chopped
- 3-4 green onions cut into thin slices
Directions
- Add sesame oil to Instant Pot and set the “Sauté” setting to high. Working in batches, if necessary, brown the chicken thighs, approximately 3-4 minutes per side. Repeat this process with remaining thighs. Remove and set aside on a platter.
- Pour chicken broth into hot container and gently scrape up brown bits from bottom. Add peanut butter to the hot liquid and stir until completed melted. Add soy sauce, lime juice, honey, Sriracha sauce, ginger, and garlic powder. Season with salt and black pepper, to taste, and stir to combine.
- Add metal rack to the Instant Pot and place the browned chicken thighs on top.
- Add lid and lock into place. Switch vent to “Sealing” position and set the “Manual” setting on high before adjusting the cook time to 10 minutes. After a brief pause, the Instant Pot will automatically start building pressure.
- When finished, do a quick release (QR) to allow the pressure to escape. Unlock and carefully remove lid when finished and transfer the chicken to a platter.
- Optional: To thicken sauce, select the “Sauté” setting and heat, stirring continually, until the excess liquid is reduced and the sauce reaches the desired consistency.
- Turn Instant Pot off and return the chicken thighs and the juices that accumulated on the platter to the sauce and turn to coat.
- Remove chicken and transfer to a serving tray. Garnish with chopped fresh cilantro, chopped peanuts, and green onions, if desired. Serve immediately with extra peanut sauce and your favorite sides. Enjoy!


Leave a Reply